Java Swing中的JFrame结构
01 结构
JFrame
JRootPane
GlassPane
JLayeredPane
JMenuBar
ContentPane(JPanel)
默认 add 是添加到这里
采用 BorderLayout 布局
02 窗体组件
JFrame
public class MyFrame extends JFrame
// 设置窗体关闭后的操作,默认不进行任何操作
setDefaultCloseOperation(WindowConstants.EXIT_ON_CLOSE);
// 设置窗体标题
setTitle("Title");
// 设置位置,以下二选一,默认在 0,0 位置
setLocation(x,y);
setLocationRelativeTo(null);
添加组件:
// 直接添加在 JFrame 下
add(new MyComponent());
add(new MyComponent(), BorderLayout.CENTER); // 等价于
// 由于 JFrame 采用了 BorderLayout 布局方式(北南东西中)
// 因此默认会放在 CENTER 填满整个窗体
// 获取 JFrame 默认的 rootPane 后添加在其下面(**不使用**)
getRootPane().add(
    new MyComponent(){{
        setBounds(x,y,width,height);
    }});
设置大小并显示:
// 设置窗体大小,默认 0*0 大小
pack();
setSize(width,height);

setVisible(true);
JComponent
public class MyComponent extends JComponent
默认绘制方法:
public void paintComponent(Graphics g) {
    Graphics2D g2 = (Graphics2D) g;

    // 设置颜色(如果是 Graphics,用 setColor)
    g2.setPaint(Color.YELLOW);
    // 描边
    g2.draw(new Rectangle2D.Double(x, y, width, height));
    // 填充
    g2.fill(new Ellipse2D.Double(x1, y1, x2, y2));

    // 绘制曲线
    g2.drawArc(x, y, width, height, startAngle, arcAngle);

    // 绘制区域
    Area area = new Area(new Ellipse2D.Double(x, y, width, height));
    area.subtract(new Area(new Ellipse2D.Double(x2, y2, width2, height2)));
    g2.fill(area);

    // 绘制文本
    String s = "Smiling...";
    // 设置字体和颜色
    Font f = new Font("Arial",Font.BOLD + Font.ITALIC, 30);
    g2.setFont(f);
    // 获取正确测量文本所需的信息容器
    FontRenderContext frc = g2.getFontRenderContext();
    // 测量
    Rectangle2D rec = f.getStringBounds(s,frc);
    // 此时, rec.getWidth() 为文字宽度
    // 绘制文本到正中央,注意是以【基准线起始点】定位的
    // 由于 ascent 为 rec.getY(),是个负数
    // 所以我们需要减去它才能得到基准线起始点应该在的位置
    g2.drawString(s,
        (int) (this.getWidth()-rec.getWidth())/2,
        (int) (this.getHeight()-rec.getHeight())/2 - rec.getY());

    // 绘制图片
    Image image = new ImageIcon("filename.gif").getImage();
    g2.drawImage(ima,0,0,null);

}
组件如果需要确定自己的大小,则覆盖以下方法:
public Dimension getPreferredSize(){
    return new Dimension(width, height);
}
设置组件的背景色:
myComponent.setBackground(Color.BLUE);
03 事件
注册监听器
JButton button = new JButton("OK");
button.addActionListener(myActionListener);
实现监听器
class myActionListener implements ActionListener {
    public void actionPerformed(ActionEvent e) {
        // Your code here
    }
}
四种常用的方法:
匿名类实现
内部类实现
直接在自身 implements 这个接口,将组件变成事件监听器
外部类实现
判断事件源
class ButtonPanel extends JPanel implements ActionListener {
    // ...
    public ButtonPanel() {
        yellowButton = new JButton("Yellow");
        redButton = new JButton("Red");
        greenButton = new JButton("Green");

        yellowButton.addActionListener(this);
        redButton.addActionListener(this);
        greenButton.addActionListener(this);

        add(b1);
        add(b2);
        add(b3);
    }

    public void actionPerformed(ActionEvent e) {
        Object source = event.getSource();
        if( source == yellowButton)
            // ...
        else if( source == redButton)
            // ...
        else if( source == greenButton)
            // ...
    }
}
适配器类
每个含有多个方法的 AWT 监听器接口都配有一个适配器类
每个适配器类都会实现相应的监听器接口中的所有方法,但这些方法都是空方法,没有做任何事情
举个例子:
class Terminator extends WindowAdapter {
    public void windowClosing(WindowEvent e){
        System.exit(0);
    }
}
WindowListener listener = new Terminator();
frame.addWindowListener(listener);
常用事件
ActionEvent -> ActionListener
按钮点击、菜单选择、选择列表项、文本域键入回车
actionPerformed
AdjustmentEvent -> AdjustmentListener
调节滚动条
adjustmentValueChanged
ItemEvent -> ItemListener
选择复选框或列表项中的一项
itemStateChanged
KeyEvent -> KeyListener
getKeyChar、getKeyCode、getKeyModifiersText、getKeyText、isActionKey
keyPressedkeyReleasedkeyTyped
MouseEvent -> MouseListener
getClickCount、getX、getY、getPoint、translatePoint
mousePressedmouseReleasedmouseEnteredmouseExitedmouseClicked
MouseEvent -> MouseMotionListener
mouseDraggedmouseMoved
MouseWheelEvent -> MouseWheelListener
mouseWheelMoved
FocusEvent -> FocusListener
focusGainedfocusLost
WindowEvent -> WindowListener
(1) 窗口事件
方法总览
public interface WindowListener extends EventListener {
    public void windowOpened(WindowEvent e);
    public void windowClosing(WindowEvent e);
    public void windowClosed(WindowEvent e);
    public void windowIconified(WindowEvent e);
    public void windowDeiconified(WindowEvent e);
    public void windowActivated(WindowEvent e);
    public void windowDeactivated(WindowEvent e);
}
(2) Action
方法总览:
public interface Action extends ActionListener {
    void actionPerformed(ActionEvent event);
    void setEnabled(boolean b);
    boolean isEnablead();
    void putValue(String key,Object value);
    Object getValue(String key);
}
// 动作名称,按钮和菜单的标签
action.putValue(Action.NAME,"Blue");
// 小图标,按钮和菜单的图标
action.putValue(Action.SMALL_ICON, new IamgeIcon("blue-ball.gif"));
// 简要说明,工具按钮提示
action.putValue(Action.SHORT_DESCRIPTION, xxx);
// 快捷键,用于菜单
action.putValue(Action.MNEMONIC_KEY, xxx);
注意,Action 没有 Adapter,而是 AbstractAction
动作与按钮关联的方法:
JButton myButton = new JButton(myAction)
KeyStroke
我们需要用 InputMap 将热键注册进组件
每个 JComponent 都有三个输入映射:
WHEN_FOCUSED 拥有键盘焦点
WHEN_ANCESTOR_OF_FOCUSED_COMPONENT 拥有包含键盘焦点的组件
WHEN_IN_FOCUSED_WINDOW 在拥有键盘焦点组件的窗口中
我们需要用 ActionMap 将热键对应的事件注册进组件
KeyStroke ctrlBK = KeyStroke.getKeyStroke("ctrl B");

// 输入映射
InputMap imap = myComponent.getInputMap(
        Jcomponent.WHEN_ANCESTOR_OF_FOCUSED_COMPONENT
    );
imap.put(ctrlBK, "Red");

// 动作映射
ActionMap amap = myComponent.getActionMap();
amap.put("Red", redAction);
(3) 键盘事件
方法总览:
public interface KeyListener extends EventListener {
    public void keyTyped(KeyEvent e); // 实际键,比如 "a"
    public void keyPressed(KeyEvent e); // 虚拟键,比如 VK_A
    public void keyReleased(KeyEvent e); // 虚拟键
}
使用方法:
public void keyPressed(KeyEvent keyEvent) {
    int keyCode = keyEvent.getKeyCode();
    if (keyCode == keyEvent.VK_RIGHT && keyEvent.isShiftDown()) {
        // ...
    }
}
(4) 鼠标事件
public interface MouseListener extends EventListener {
    public void mouseClicked(MouseEvent e);
    public void mousePressed(MouseEvent e);
    public void mouseReleased(MouseEvent e);
    public void mouseEntered(MouseEvent e);
    public void mouseExited(MouseEvent e);
}

public interface MouseMotionListener extends EventListener {
    public void mouseDragged(MouseEvent e);
    public void mouseMoved(MouseEvent e);
}
判断双击:
public void mouseClicked(MouseEvent e){
    if(e.getClickCount()>=2){
        // ...
    }
}
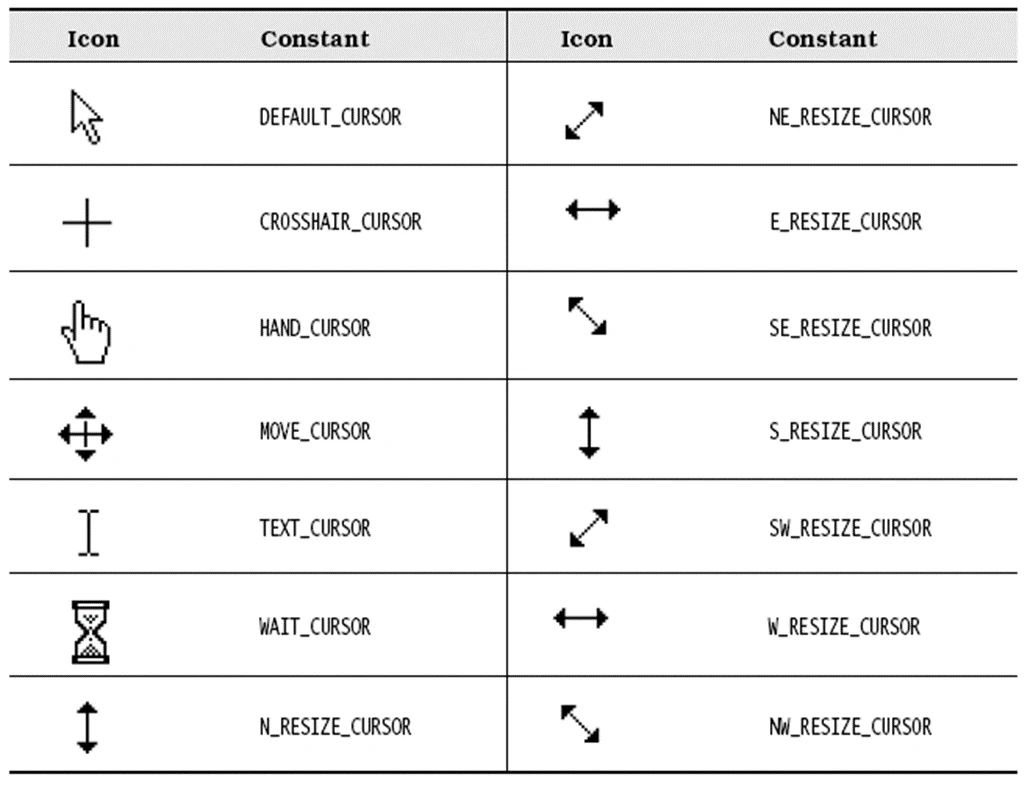
设置光标
setCursor(
        Cursor.getPredefinedCursor(Cursor.CROSSHAIR_CURSOR)
    );
// 或者

setCursor(Cursor.getDefaultCursor());
04 组件
JButton
JButton(String label);
JButton(Icon icon);
JButton(String label, Icon icon);
- 感谢你赐予我前进的力量
-
 微信
微信  支付宝
支付宝